Saturday, June 5, 2021

Blueberry Buckle!


It’s June and you know what that means (cue the song “June is Busting Out All Over!” - Google it)? Blueberries! Of course, you can get blueberries anywhere and almost anytime of year nowadays, but for big, fat, juicy, super-fresh, farmer’s market blueberries, you’ve got to wait for June. And to celebrate official blueberry season, I made this gorgeous Blueberry Buckle. 


Originally, this recipe from the ever-reliable folks at King Arthur Flour, was gluten-free (made with Measure-for-Measure gluten-free flour), but my version was made with regular AP flour. Other than that, and the addition of a bit of nutmeg, the recipe remains the same. Adding some chopped pecans to the streusel wouldn’t hurt…


The cake bakes up so light and fluffy, with a fabulous streusel topping. I added a light dusting of confectioners’ sugar right before serving, because why not? It freezes very well, too, so if you’ve got the time (and the berries), make it now, cut into squares, wrap it well, and freeze. Then when a friend drops by for coffee, you can pull out a few squares and be ready in no time.


Happy Fresh Berry Season!


Blueberry Buckle (adapted from King Arthur Flour)


Ingredients:


Streusel:

1/3 C sugar

1/2 C AP flour

1 t cinnamon

1/2 t nutmeg

1/8 t salt

4 TB butter, at room temperature, at least 65°F


Cake

2 C AP flour

2 t baking powder

1/2 t salt

3/4 C sugar

4 TB butter, softened

1 large egg, room temperature

1 t vanilla extract

1/2 C milk, room temperature

2 C fresh (or frozen) blueberries


Directions:


  1. Preheat oven to 375°F. Lightly grease an 8” square, 9” square, or 9” round pan; make sure your pan of choice is at least 2” deep.
  2. To make the streusel topping: mix the sugar, flour, cinnamon, nutmeg, and salt in small bowl. Work in the butter until the mixture becomes evenly crumbly. Set aside.
  3. To make the cake: in a medium-sized mixing bowl, whisk together the flour, baking powder, and salt.
  4. In a separate bowl, beat together the sugar, butter, egg, and vanilla.
  5. Add the flour mixture and the milk alternately to the sugar/butter mixture, beginning and ending with flour. Gently stir in the berries.
  6. Pour the batter into the prepared pan. Sprinkle the streusel on top.
  7. Bake the cake for 45-50 minutes, or until a toothpick or knife inserted into the center comes out clean.
  8. Remove the cake from the oven, and set it on a rack to cool for 10 minutes. Serve right from the pan. Or to transfer to a serving plate, loosen the sides with a knife or spatula. Holding the pan in one hand, gently tip the cake out onto your other hand, remove the pan, and turn the cake topping-side up onto a serving dish. 
  9. Store cake, covered, for a couple of days at room temperature; wrap securely and freeze for longer storage.



Wednesday, May 5, 2021

Greek Easter Cookies (Koulourakia)


Do you ever want “just” a simple, but delicious, cookie? One that’s easy to make, doesn’t have a zillion ingredients, keeps well, and is perfect for enjoying as a light breakfast, or as an after dinner treat? Well, look no further.


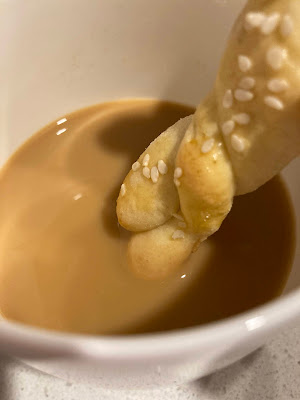
In doing research to bring a traditional dessert to a friend’s home for Greek Easter dinner, I happened upon Koulourakia, a crispy, yet buttery-soft, citrus-scented cookie. At first taste, right after the first tray emerged from the oven, I was not overly impressed. They were nice enough, but not anything special. But after my second tasting (quality control!), they started to grow on me. I loved their adorable little braided shape and the lightness of the dough. My dinner companions loved them (and the highest complement of all, telling me they reminded our hostess of her Greek mother’s version!); and as I continued to enjoy one (or two) after dinner last night, dunking them into my coffee, I proclaimed them a winner! 


I think next time (because there WILL be a next time), I might add a bit more orange flavor, and maybe instead of sesame seeds as a topping, I might opt for some crystallized sugar for a touch more sweetness. Of course, I know this totally changes the original nature of this cookie, but no harm in experimenting, right?


Happy Spring!

Photo courtesy of Pexels.com 


Koulourakia (Greek Easter Cookies) 

Adapted from curiouscuisiniere.com 


Ingredients:


1/2 C unsalted butter, softened

3/4 C sugar

2 eggs

1/4 C milk, warmed to 80°F

1 t pure vanilla extract

1 orange, zested

2 t baking powder

2-1/2 C unbleached all-purpose flour

1 egg beaten with 1 TB of water (for the egg wash)

Sesame seeds (for topping)


Directions:

  1. In large bowl, cream the butter and sugar until light and fluffy. Add the eggs, and beat until lightly colored. Add the milk, vanilla, orange zest, and baking powder (mixing as you add).
  2. Add the flour, a little at a time, while mixing, until you have a soft but not sticky dough.
  3. Cover the dough with plastic wrap and chill 30 minutes.
  4. While the dough is resting, preheat oven to 350°F.
  5. Once the dough has rested, dip your fingers in a little flour and pinch off a 1” ball of dough. Roll the ball into a 6” rope on a lightly floured surface. Fold the rope in half and twist the two strands together to form the cookie. Continue with the remaining dough (see note at bottom of recipe).
  6. Place the shaped cookies on a parchment-lined baking sheet, 1” apart.
  7. Brush each cookie with the egg wash. Sprinkle with sesame seeds.
  8. Bake for 15-20 minutes (mine took exactly 15 minutes, so watch carefully), rotating the baking sheets halfway through baking for more even cooking. Cookies are done when lightly golden.
  9. Let cool on the baking sheet on a rack for 5 minutes before transferring to a rack to cool completely.
  10. Store cooled cookies in airtight container for up to 3 weeks.

Note: this recipe makes alot of cookies (approximately 50-60) so cover remaining dough with plastic wrap while first batch bakes to prevent dryness.

Friday, April 16, 2021

Farmhouse Buttermilk Cake with Pecan Streusel Topping


Leftover buttermilk is a predicament I think most bakers find themselves in from time to time. It’s usually sold in quart containers, and typically, you only need a cup or less for a recipe. So what to do with the remainder? This is where I found myself earlier this week, after having realized I had an open bottle of buttermilk in the fridge with an approaching expiration date and no immediate plans to use it (see tip at end about freezing buttermilk).


After much Googling, I found this recipe that sounded terrific. Of course, it helped that I had all the ingredients in the house. This cake from The Cafe Sucre Farine web site was adapted from a King Arthur recipe, and it is a hit! It reminded me of the luscious, addictive pralines I enjoyed on my first trip to New Orleans, only in cake form. It’s got everything (IMHO) a cake should be: moist (because buttermilk), flavorful (of course!), a little bit crunchy (thanks to the pecan streusel), and easy! It’s a one-bowl wonder (well, two, if you count the streusel mixture) and no mixer required (although I do think the initial mixing of the butter and brown sugar would be easier with a hand or stand mixer). For the streusel, I used the incredible pecans from The Peach Truck - what a revelation really fresh pecans are. Raw and natural, these pecans are everything you imagine a Georgia pecan to be.


This cake is the perfect after-dinner accompaniment to a pot of coffee. A bit too sweet, I think, for a breakfast treat, but you may feel differently.  I thoroughly enjoyed a piece last night and it took all my restraint not to go back for another slice. Now my only problem is, what do I do with the rest of it? I hope it freezes well!


Farmhouse Buttermilk Cake with Pecan Streusel Topping


Ingredients:


Cake:


1/4 C butter, very soft

1 C light brown sugar

1 large egg

1 C buttermilk

1 t vanilla extract

1 t baking soda

1/2 t salt

1-1/2 C all-purpose flour


Streusel:


3 TB melted butter

1/2 C light brown sugar, packed

2 TB half & half

1/8 t salt

3/4 C diced pecans


Directions:

  1. Preheat oven to 350°. Spray a 9” round cake pan (with at least 2” tall sides) with baking spray and line with parchment paper. Set aside.
  2. Combine the butter and brown sugar and stir until smooth.
  3. Add the egg, beating again until smooth.
  4. Stir in the buttermilk and vanilla extract.
  5. Sprinkle the flour, baking soda, and salt evenly over the top and stir until well combined.
  6. Pour the batter into the prepared pan.
  7. Bake the cake for 30 minutes or until a toothpick inserted in the center comes out clean and/or the cake springs back when lightly touched in the center.
  8. During the last 10 minutes of baking time, prepare the topping. Stir the butter and the sugar together. Add the milk, pecans, and salt. The glaze will be thick, but pourable (don’t let this sit too long, or it will become too thick to pour).
  9. After the cake has baked for 30 minutes, pour the topping over the cake and return it to the oven for another 10 minutes (for a total baking time of 40 minutes). Remove the cake from the oven and allow to cool for 20 minutes in the pan. Sprinkle lightly with flaky sea salt, if desired, and serve warm or at room temp. Topping will firm up as the cake cools.
  10. Cake can be served in the pan or on a serving platter/cake stand. To serve on a platter, invert cake onto a dinner plate, then invert again so the topping is right-side up. 
PS: I found a great way to freeze leftover buttermilk here!. I’ve got an ice cube tray cooling in my freezer right now.

Monday, March 29, 2021

Cherry Tomato "Candy"


OK, how is it, that I grew up in an Italian household and never heard about, or saw anyone roasting tomatoes?! How could this be? I have no answers. But, I have recently remedied this disturbing part of my past.


During the first episode of the adorable “Waffles and Mochi” on Apple TV, one of my favorite chefs, Samin Nosrat, teaches the two Muppet-type friends how to turn ordinary cherry tomatoes into tomato “candy.” As a sidebar, if you have Apple TV, tune into this show - it’s billed as a “food adventure” show to help families learn to eat healthier by exploring new ingredients. It is really well done, and every episode focuses on a different ingredient and region of the world. 


So, onto the candy! There is very little prep here but a very, very long roasting time, so plan to do this when you’ve got alot of stuff to do around the house. Once you’ve made the candy, you can store it in a glass jar or container, simply covered in olive oil, in the refrigerator for up to six weeks (see notes below).


I’ve been enjoying these tomatoes as a wonderful topping for pasta (with freshly grated ricotta salata and torn basil), as part of an omelette, or simply as a delicious snack. These are sweet little flavor bombs - make them! You won't be disappointed.


Samin Nosrat’s Cherry Tomato “Candy”


 Ingredients:


2 pints cherry tomatoes, stems removed

2 TB extra virgin olive oil

1/2 t sugar

Fine sea salt


Directions:


Preheat the oven to 225°F. Set oven rack to middle position. Line a baking sheet with parchment paper.


In a large bowl, toss tomatoes with 2 TB of olive oil to coat, then add sugar and 1/2 t salt. Gently toss again to coat.


Using your hands, but being careful not to squish the tomatoes, spread tomatoes onto baking sheet in a single layer, then place in the oven on middle rack.


Every 30 minutes or so, jiggle the tomatoes to make sure they’re not sticking to the pan, and rotate the pan 180 degrees - all the way around - to keep the tomatoes cooking evenly. Roast until the tomatoes are semi-dried and shriveled and start to taste like “candy,” about 5 hours.


Notes:


If you don’t have time to slow-roast the tomatoes, raise the oven temperature to 350°F. Skip the sugar (it will burn at the higher temp) and toss the tomatoes with only olive oil and salt. Roast as directed until the tomatoes are shriveled and just starting to split, about 45 minutes. Tomatoes cooked at this temp won’t hold their shape in pasta and they won’t be quite as sweet, but they will still be delicious.


Because it takes so much time to make the tomato candy, this is a great recipe to double, or even triple, in the summer when every store and farmer’s market has lots of tomatoes. You can put any extra tomato candy in a glass jar, cover the tomatoes with olive oil, and refrigerate up to six weeks. Or, freeze them in a single layer on a baking sheet until solid and then pack them into freezer bags and freeze for up to six months.

Saturday, March 20, 2021

Zero Point Chicken Chili


While you may think of chili as a fall/winter dish (and we are clearly coming out of those seasons), this easy and delicious chili should definitely be on your “anytime of year” list.


Developed by the terrific chef and cookbook author, Virginia Willis, as part of her healthy eating plan, as the title indicates, it has zero Weight-Watcher points. But if you’re thinking a WW dish may not be very tasty, forget it - this dish is full of flavor and spice, thanks to the chili powder, cumin, and  chipotle in adobo pepper (which adds a nice smoky essence). You can ramp the spice up or down, depending on personal preference.


Virginia’s original recipe calls for 99% fat free ground chicken. I used dark meat ground chicken so mine was probably (most definitely) not zero points, but the flavor was fabulous! I served it over white rice, with a salad on the side, and a glass of red wine (‘cause that’s what was open).


It takes a little prep time to properly cook the beans, but after that the recipe sails along quite nicely. This makes a pretty large quantity so I cut the recipe in half and it worked just as well (I used a 4qt saucepan so if you make the full recipe, adjust your pan size accordingly).


BTW: Virginia has a brand-new little book just published that may be of interest to you: Fresh Start, My Real Life Guide to Healthy Eating and Weight Loss. I downloaded it via Kindle and it’s chock-full of healthy, tasty recipes.


Today, Saturday, March 20 is the first day of Spring (hallelujah!). If the weather cooperates where you live, try to get outside. And think of this quote from Anne Bradstreet as you wander: “if we had no winter, the spring would not be so pleasant.”


Zero Point Chicken Chili (Virginia Willis)


Ingredients:

  • 2 C dried black beans
  • 1 large onion chopped
  • 6 cloves garlic chopped
  • 3 TB chili powder
  • 2 t ground cumin
  • 1 28-ounce can diced tomatoes in juice
  • 1 chipotle en adobo
  • 3 C vegetable stock (more if needed)
  • 2 lbs 99% fat free ground chicken
  • Coarse salt and freshly ground pepper

Directions:

  1. Soak the beans overnight or quick soak the beans. Place in a pot and cover with water. Bring to a rolling boil over high heat. Set aside for one hour. Drain.
  2. Combine soaked beans, onions, garlic, spices, tomato, and chipotle. Add vegetable stock. Bring to a boil and reduce heat to a simmer. Season with salt and pepper (yes, salt your beans!). Cook until beans are tender, about 1 hour or more, depending on the age of the beans.
  3. Once the beans are tender, add the chicken and stir to combine. Cook until chicken is white and no trace of pink remains, about 5 minutes. Taste and adjust for seasoning with salt and pepper.
  4. Serve.

Thursday, March 11, 2021

Ted Lasso's "Biscuits with the Boss" Shortbread


If you’ve watched the Apple TV+ show Ted Lasso, you are familiar with his famous biscuits. He brings them to his daily morning meetings (in adorable little pink boxes) with his boss & pretty soon she is addicted. Even if you have not seen this hit show (BTW: Jason Sudeikis won Best Actor in a television series - comedy or musical at last week’s Golden Globes; you really should try to see it, it’s one of the most positive, uplifting, happy things I’ve seen in a long, long time), the show’s biscuits have taken over the internet food world and are really worth making. They are super-easy and come together very quickly. 


As a quick aside, the show is about an American football coach who relocates to England to lead a professional British soccer team (with absolutely no knowledge of soccer). You can imagine the situations that ensue.


I made them last week and let me tell you, they are fabulous. They are very much like a traditional English shortbread, but a bit more sweet and chewy, rather than crunchy. Of course, you can tamp down the sugar if you like (I might do that myself next time). They keep very well in an airtight container (I have not tried freezing them yet, but I would imagine they freeze well). They are the perfect accompaniment to your morning coffee (or tea, if you’re following along the classic British lines), or even as an after-dinner sweet. 


If you make these biscuits, leave a note below to let me know what you think. Have a great day!


Ted Lasso’s “Biscuits with the Boss” Shortbread


Ingredients:


1 C unsalted butter, softened, cut into pieces, plus more for greasing the pan

2 C all-purpose flour

1/2 C granulated sugar

1 t pure vanilla extract

1/2 t fine sea salt


Directions:

  1. Preheat oven to 350ºF. Grease a 9” square baking pan with butter. Line bottom and sides of pan with parchment paper, leaving a 1” overhang on all sides. Set aside.
  2. Beat butter, flour, sugar, vanilla, and salt with a stand mixer fitted with paddle attachment on low speed until mixture is well-combined and just beginning to come together, 45 seconds to one minute.
  3. Using your hands, press dough evenly into prepared pan. If mixture is too sticky, place a sheet of parchment paper on top of dough and press into pan (remove parchment before baking).
  4. Bake until edges are golden brown, 30-35 minutes. Remove from oven, and cool completely in pan, about one hour. Using parchment as handles, lift biscuits from pan.
  5. Cut into 18 rectangles. Store in airtight container.

Friday, March 5, 2021

Irish Soda Bread


Every year I think of baking this wonderful bread too late.  But this year I am actually early!  In reality, this bread is wonderful any time of year - not just for St Patrick’s Day.


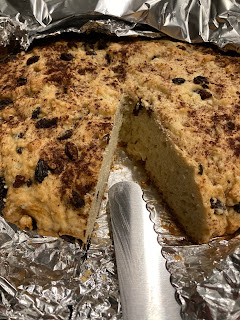
Not your typical Irish Soda Bread because it does not contain fennel seeds, and it has a delicious cinnamon/sugar topping (definitely not traditional), but eat a slice warm from the oven, top it with a bit of good salted butter, brew yourself a cup of tea, and settle back for what could be the best part of your day.


This is a large soda bread, but it freezes beautifully. Just cut into portions and wrap well.


This recipe is from someone I worked with many years ago. We lost touch, but her recipe is still my tried-and-true favorite soda bread. Hope you enjoy it!


Barb’s Irish Soda Bread


Ingredients:


4 C flour

1 t. baking soda

1 C sugar

3/4 C melted butter

1 C raisins (pre-soaked in water)

1-1/3 C buttermilk

1 egg

2 t cinnamon

1 t sugar


Directions:


Make a cinnamon-sugar mixture for top of bread (you can adjust these measurements to your liking).


Pre-heat the oven to 350 degrees. Foil-line a 10" oven-proof frying pan  (I use a cast iron pan) and butter the foil.


Sift together the flour, baking soda, and sugar. Then combine the remaining ingredients into the dry ingredients. Mix all together until just combined. Scrape batter into foil-lined pan.


Make a cross in the top of the dough with a knife (FYI: a reference I found said this was not for religious reasons; it was a very practical way to divvy up the bread into four portions - pretty smart, huh?). 


Sprinkle the top of dough with cinnamon-sugar mixture. Bake for 1 hour.