Showing posts with label baking zen. Show all posts

Sunday, May 29, 2022

Baking Zen, When We All Need It Most…


I have always found happiness in baking. I’ve also found comfort, solace, and a sort of zen in the familiar movements (measuring, kneading, rolling) of baking. It’s something primarily done alone, just with your thoughts or perhaps with your favorite music in the background. And then, of course, there is that moment when you take the cake (muffin, cookie, whatever) out of the oven and taste it. It could be an entirely new taste from something you’ve never made before. Or it could be a memory taste, from your childhood, or from a trip you took. Either way, it’s wonderful. And I always find joy in sharing my baked goods (I subscribe to the Dorie Greenspan theory of “bake and release.”).


This past week I felt the need to bake after hearing about the second mass shooting in our country in less than a week. I know you come to this blog for food-related stories, so I will not stray too far from that focus today. But I must say that when it is legal for an eighteen year old to buy a gun but not to buy cigarettes or alcohol, there is something seriously wrong with our country’s morals. So if you care about your children being able to sit in a classroom without fear, or for anyone to go grocery shopping, or go to a house of worship without fear of being gunned down, write/call/visit your elected representatives and beg them to vote for sensible, meaningful gun control. Thank you.


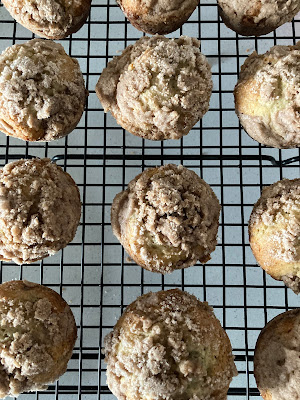
Have some very ripe bananas hanging around your fruit bowl? Make these muffins! They are deliciously moist and tender with a terrific cinnamon-crumb topping. I made them just as the recipe outlines, but next time I might add some chopped walnuts to the crumb topping for a little more texture. But they are absolutely wonderful as is. You may want to bake some this weekend to share with friends or family in need of a little baking love. We can all use it right about now.


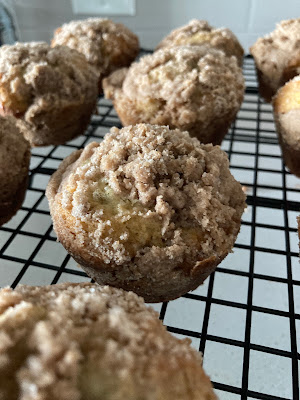
Banana Crumb Muffins (King Arthur Flour)


Topping:


1/2 C AP flour

1/4 C sugar

1 t cinnamon

4 TB (1/2 stick) unsalted butter, room temp*


Muffins:


1-1/2 C AP flour

1 t baking soda

1 t baking powder

1/2 t salt

3 large, ripe bananas, mashed

3/4 C sugar

1 egg, slightly beaten

1/3 C butter, melted*


Directions:

  1. Preheat oven to 375°F
  2. For the topping, in a medium bowl, mix flour, sugar, and cinnamon. Add butter and mix with a fork or pastry cutter until crumbly. Put aside while preparing muffin batter.
  3. For muffins, in large bowl, combine dry ingredients. Set aside.
  4. In another bowl, combine mashed bananas, sugar, slightly beaten egg, and melted butter. Mix well. Stir into dry ingredients just until moistened.
  5. Fill greased muffin cups 2/3 full (do not use paper muffin cups). Using hands, arrange coarse, pea-sized crumbs over muffin batter.
  6. Bake for 18-20 minutes or until muffins test done with a cake tester. Cool in pan 10 minutes before removing to wire rack.


*The original recipe calls for butter or margarine, so feel free to use margarine if you prefer.


Saturday, January 29, 2022

Homemade Challah

Greetings from the snowy, windy, freezing Jersey shore! This is not where I expected to find myself at this time of year, but it is what it is (as “they” say). 


During the previous snowstorm a couple of weeks ago, I retrieved a container of homemade split pea soup from the freezer to enjoy over the next couple of days. It was a beautiful, thick, stick-to-your-ribs soup, flavored with a ham bone generously provided by my cousin at Christmas. But as I started to defrost it, I realized it needed something. Not anything added to the soup itself, but an accompaniment. And what goes better with a steaming bowl of hearty soup than fresh bread. Not wanting to go out during the storm, I realized I had all the ingredients for homemade bread right here. I never attempted challah before, but I thought, “what the heck, I’ll try it!” I’m so glad I did. Not only did it come out great, but it was SO easy! 


yeasty, bubbly goodness

Using a recipe from thekitchn.com I spent a glorious few hours kneading, rolling, and rising the dough, while the wonderful yeasty fragrance perfumed my kitchen. I held my breath after it baked and sliced off the end to sample it. It was damn good! Eating it later with the pea soup was pure bliss. The next day (and the day after that), I ate the bread slathered with salted butter for breakfast. The bread sat on my counter for almost a week as I nibbled a slice here and there every day (it keeps well wrapped in plastic wrap).


Don’t let anyone tell you baking homemade bread is hard. It’s not. It does require time and patience. The end result is totally worth it.


If you are in the path of winter storm “Kenan,” I hope you are warm and safe. Stay in, listen to music, read a good book, make soup, bake bread.


Thought you'd enjoy this picture from Twitter of these adorable "snow cats!"


Until next time, eat well, stay warm, be happy.

Friday, March 5, 2021

Irish Soda Bread


Every year I think of baking this wonderful bread too late.  But this year I am actually early!  In reality, this bread is wonderful any time of year - not just for St Patrick’s Day.


Not your typical Irish Soda Bread because it does not contain fennel seeds, and it has a delicious cinnamon/sugar topping (definitely not traditional), but eat a slice warm from the oven, top it with a bit of good salted butter, brew yourself a cup of tea, and settle back for what could be the best part of your day.


This is a large soda bread, but it freezes beautifully. Just cut into portions and wrap well.


This recipe is from someone I worked with many years ago. We lost touch, but her recipe is still my tried-and-true favorite soda bread. Hope you enjoy it!


Barb’s Irish Soda Bread


Ingredients:


4 C flour

1 t. baking soda

1 C sugar

3/4 C melted butter

1 C raisins (pre-soaked in water)

1-1/3 C buttermilk

1 egg

2 t cinnamon

1 t sugar


Directions:


Make a cinnamon-sugar mixture for top of bread (you can adjust these measurements to your liking).


Pre-heat the oven to 350 degrees. Foil-line a 10" oven-proof frying pan  (I use a cast iron pan) and butter the foil.


Sift together the flour, baking soda, and sugar. Then combine the remaining ingredients into the dry ingredients. Mix all together until just combined. Scrape batter into foil-lined pan.


Make a cross in the top of the dough with a knife (FYI: a reference I found said this was not for religious reasons; it was a very practical way to divvy up the bread into four portions - pretty smart, huh?). 


Sprinkle the top of dough with cinnamon-sugar mixture. Bake for 1 hour.


Wednesday, November 18, 2020

Cinnamon Crunch Banana Bread


Just the name alone of this bread makes me happy.  Cinnamon. Crunch. Banana. Hmmmm. Happiness.

The other day I discovered a container of mashed bananas in the freezer and while there are probably thousands of banana bread recipes on the "Google machine," I felt the need for something a little more interesting. This recipe from the ever-reliable NYT Cooking site fit the bill; the only thing I changed was to add chopped walnuts to the batter and the topping (I felt it needed more crunch). 

I'm sure you have your own library of ready-to-go banana bread recipes, but I must enthusiastically recommend this one. The ratio of bananas/cinnamon/crunch is perfect. The bread is super-moist and packed with deliciousness. It is a little on the sweet side due to the double sugars in the topping (I don't mind that, but you can probably reduce the sugar a bit if it's a concern for you). A bonus is that you don't need an electric mixer - just two mixing bowls, a whisk, a couple of spatulas, and a 9x5 loaf pan. My cake sank a bit on the top after baking, but other than that, it is fabulous.

So go forth and bake this bread! Or, as they say on the Great British Baking Show: Ready, Set, BAKE!

Cinnamon Crunch Banana Bread (NYT)

Ingredients for the batter:

Unsalted butter, for greasing

1-1/2 C all-purpose flour

1 C granulated sugar

1 t ground cinnamon

1 t baking soda

1/2 t kosher salt

1/2 C vegetable oil

2 large eggs

1/4 C honey

1 C mashed ripe bananas (2-3 medium bananas)

1/2 C chopped walnuts (my addition)

1/4 C warm water

Ingredients for the topping:

1/4 C brown sugar, preferably light brown or Demerara (I used light brown)

2 TB granulated sugar

1 t ground cinnamon

1/4 C chopped walnuts

Preparation:

1. Heat oven to 350 degrees. Butter a 9x5" loaf pan and line it with parchment or wax paper, leaving enough paper hanging over the sides to lift the cake out after baking. (This will prevent the topping from breaking when removing the bread from the pan.)

2. Prepare batter: in a medium bowl, combine flour, granulated sugar, cinnamon, baking soda, and salt. In a large bowl, using a sturdy whisk, beat together oil, eggs, and honey until smooth. Stir in bananas and warm water. Add dry ingredients to egg-oil mixture and stir to blend; stir in nuts. Pour batter into prepared pan.

3. Make topping: in small bowl, mix brown sugar, granulated sugar, cinnamon, and nuts, using your fingers to break up any lumps. Sprinkle evenly over batter.

4. Bake until a tester inserted in center comes out clean, about 1 hour, checking after 50 minutes. If topping shows signs of burning, reduce heat to 325 degrees.

5. Remove to a rack and let cool in pan for 30 minutes. Use edges of paper to lift cake up and out. Place on a rack (leave the paper on) and let cool before slicing and serving.


Tuesday, May 9, 2017

Lessons from "Baking Fails"

A few weeks ago, I came upon a recipe for a cookie that caught my eye. It’s called “torcetti,” a type of old-school Italian sugar cookie. It’s a bit unusual as it is made with yeast, which most cookies do not have. Besides yeast, the recipe called for European-style butter which I had never used so this intrigued me. I gathered up the ingredients and went to work.

But first a little history. According to the website, Turin Epicurian Capital, these cookies date back to around 1700. An article supposes that during around that time, while waiting for bread to bake in community ovens, some of the bakers took leftover dough, shaped it into a type of breadstick, coated them with sugar or honey, formed them into little “twists,” and baked them. Voila - torcetti! 

There are a zillion recipes for torcetti out there. I used one from Food52, one of my trusted sites, and I liked the fact that it recommended an overnight rise.
Torcetti from Food52

Off I went to work! Followed the recipe to the letter - used a thermometer to test the water temperature to dissolve the yeast; placed the dough in the oven for the first rise; creamed the softened butter and added it to the dough. You get the idea…

My first pangs of fear that this was turning into a “baking fail,” was trying to incorporate the butter into the dough. It took forever and a lot more flour than called for to get a non-sticky, manageable dough. Finally, it came together! Since I was utilizing the overnight rise, I covered the dough with plastic wrap and placed the bowl in the fridge.  

The next morning, giddy with anticipation, I pulled the dough from its’ chilly slumber, and stared at the bowl in disbelief. It had not risen at all. At all. My first thought was, “well, that was a big waste of expensive European butter, four cups of flour, wah, wah, wah.” 

But I really didn’t want to toss the whole thing out, so I preheated the oven to 250 degrees, turned it off, shoved the covered bowl in, and waited. I figured I had nothing to lose at this point. In about an hour, the dough had magically doubled in size. I was thrilled! Maybe this wasn’t going to be a wasted effort after all. 

after the oven-rise
Again, I went back to the directions: rolled out the dough to the stated dimensions, cut the strips, rolled in sugar, and baked them. 
ready for the oven
Twelve minutes later, I had the saddest looking cookies on my baking trays. But, I thought, even if they don’t look great, if they taste good, I’ll be happy. Let me cut right to the chase here and not keep you in suspense (although I'm sure you've guessed the outcome): they were terrible! Heavy, dense, tasteless. I was so disappointed!I threw them all out.
finished cookies

So what did I learn from this? I rediscovered how much I LOVE working with yeast dough! The last yeasty-type recipe I made (a few years ago) was the fabulous brioche from Joanne Chang of Flour Bakery in Boston. The smell as I worked the dough was intoxicating. And kneading it put me in an almost zen-like state. There is  definitely something to be said for how baking can be relaxing and reduce stress

I’m not sure why my torcetti did not come out as they should (I don't think it was the recipe); perhaps the yeast was old (even though the expiration date was months away), maybe I overworked the dough? Who knows? Will I attempt them again? Definitely. 
sad cookies

I know a lot of people may not feel that baking is relaxing, but if you focus on the physical activity of rolling or kneading the dough, enjoy the smell of the yeast or the spices in your recipe, you’ll most likely forget about what else is going on in other parts of your life - the daily stresses - at least for awhile. Making these torcetti reminded me of the pleasures of baking. 


Have you had a baking fail that you’ve learned from? Leave a comment below.