Showing posts with label Food52. Show all posts

Friday, July 8, 2022

Blueberry Schlumpf


Photo credit: LK

Wow! Wow! Wow! Not hyperbole. This recipe is a WOW! From Food52, a recipe from Marian Bull, who got it from a distant relative, this should be your go-to summer dessert recipe.


The recipe calls for wild blueberries, but unless you live in Maine, or somewhere else where wild blueberries are widely available, regular blueberries will do fine. I made this with incredible New Jersey blueberries picked up at my local farmer’s market - huge, plump, sweet - and I think it really made the dish.


It couldn’t be easier. Combine the blueberries with a bit of flour and sugar; dump in a baking dish. Then mix the topping together, sprinkle over the blueberry mixture, and bake.


Serve warm from the oven with a scoop of “good” vanilla ice cream (I used Häagen-Dazs). The “yummy” sounds around the table told me this recipe was definitely a winner. Even without ice cream, which is how I ate it the next day, it was outstanding.


Blueberry Schlumpf

(Food52)


Makes one 8x8” pan.


Filling:


1 qt wild blueberries (conventional will do)

2 TB flour

2 TB sugar


Topping:


1 C flour

1/2 C brown sugar

1/2 C cold butter, cut into pieces


Directions:

  1. Preheat oven to 350°F.
  2. Mix the filling ingredients and put in 8x8” baking dish.
  3. Mix the topping roughly (so that it’s still lumpy) and sprinkle over the top. Bake for 30 minutes. Serve hot, preferably with vanilla ice cream.

Friday, November 12, 2021

Italian Night!


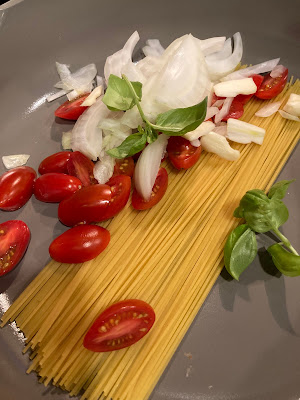
I finally made the famous Marcella Hazan tomato sauce with onion and butter that has been written up by every food writer and blogger from NYC to Milano. Wow. What the heck was I waiting for? This couldn’t have been easier or more delicious. With only three ingredients (four, if you count the salt), and only three steps, within an hour you will have a bright, clean, delicious tomato sauce perfect for a host of dishes.


The three (four) ingredients:


Fresh, ripe tomatoes or 1 can (28 oz) imported Italian tomatoes

5 TB butter

1 medium onion, peeled and cut in half

Salt to taste

Full recipe below.


You may be thinking, “butter, and an onion just cut in half and thrown in??” Yes. And, whatever you do, do not discard that onion post-cooking. It is the sweetest, most delicious onion you’ll ever eat! A couple of commenters on Food52 suggested using a stick blender and whirling it back into the sauce. Another suggested just eating the onion outright (I did this, it was fabulous). No wrong answers.


simmering


The day I made the sauce, I ladled it over a twirl of linguini, added a few torn basil leaves, and showered it with freshly grated Parmigiana Reggiano (that gorgeous image at the top). Simple perfection!


On day two, I had a “voglia” (Italian slang for a craving - pronounced “wool-lea,” depending on the region) for chicken parm. Don’t ask me why, I just did. I almost never crave red sauce-type Italian-American dishes, but this week I did. I found a pretty low-intensity (read: not a million steps) recipe, used the leftover Marcella sauce, and used Panko instead of breadcrumbs to produce a crispier, crunchier coating. It was terrific. I didn’t go totally old school and serve it over spaghetti, but I did enjoy a crusty Italian bread alongside the parm.


Old school chicken parm


I didn’t have any Italian reds in the house so I used a hearty zin, which worked just fine.


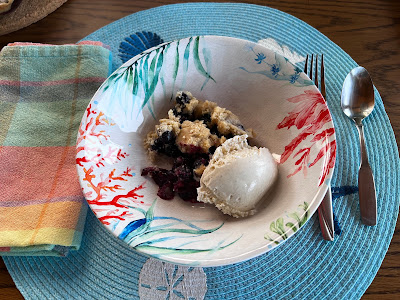
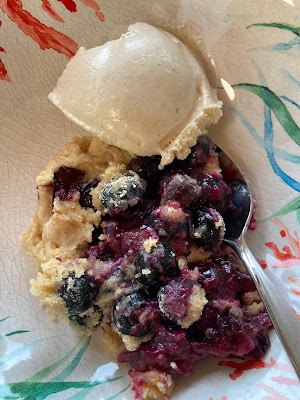
And, finally, to complete Italian night, I made the easiest dessert possible (if you have the means to make espresso): affogato. In Italian, affogato means “drowned.” You literally drown cold ice cream in hot espresso. 


I recently treated myself to a starter espresso machine (made by Capresso and purchased on sale) and I am loving it. Two cappuccinos in the morning and, sometimes, a decaf espresso in the afternoon, and I’m good to go. 


Affogato is a divine little treat. What could be better than ice cold ice cream (in my case, coffee), drowned in dark, delicious espresso? My go-to ice cream of late is Enlightened’s cold brew coffee. At only 90 calories for 2/3 cup, it is all indulgence and zero guilt. I honestly don’t know how they make such a rich, creamy ice cream that clocks in at that caloric rate. But, whatever, I’m on board. The picture of my affogato was sub-par so I’ve included a stock image so you get the gist of what it “should” look like.


Photo by Sarah li from Pexels


Marcella Hazan’s Tomato Sauce with Onion and Butter


Serves 6, enough to sauce 1 to 1-1/2 lb pasta

Prep time: 15 minutes

Cook time: 45 minutes for the sauce


2 lb fresh tomatoes, prepared as described below, or 2 C canned imported Italian tomatoes, cut up, with their juice

5 TB butter

1 medium onion, peeled and cut in half

Salt to taste


  1. Put either the prepared fresh tomatoes or the canned in a saucepan, add the butter, onion, and salt, and cook uncovered at a very slow, but steady simmer for about 45 minutes, or until it is thickened to your liking and the fat floats free from the tomato.
  2. Stir from time to time, mashing up any large pieces of tomato with the back of a wooden spoon.
  3. Taste and correct for salt. Before tossing with pasta, you may remove the onion (as Hazan recommended) and save for another use, but many opt to leave it in. Serve with freshly grated Parmigiano-Reggiano cheese for the table.


Food52 editor’s note: Marcella called for 2 cups of tomatoes when using canned, but feel free to use a whole 28 oz can (closer to 3 cups), if you like. You can scale up the butter and onion, if you like, or don’t - it’s genius either way.


Making Fresh Tomatoes Ready for Sauce


The blanching method: Plunge the tomatoes in boiling water for a minute or less. Drain them and, as soon as they are cool enough to handle, skin them, and cut them into coarse pieces.


The freezing method (from David Tanis, via The Kitchn): Freeze tomatoes on a baking sheet until hard. Thaw again, either on the counter or under running water. Skin them and cut them into coarse pieces.


The food mill method: Wash the tomatoes in cold water, cut them lengthwise in half, and put them in a covered saucepan. Turn on the heat to medium and cook for 10 minutes. Set a food mill fitted with the disk with the largest holes over a bowl. Transfer the tomatoes with any of their juices to the mill and puree.


Tuesday, June 22, 2021

Martha Stewart's One-Pan Pasta


Greetings, dear readers!


I hope things are well with you in your part of the world.


So, I’ve had this recipe from Martha Stewart for awhile now (clipped from food52.com). The one-pan thing intrigued me — throw everything into a pan, including the uncooked pasta, and cook. Couldn’t be easier, right? I decided to give it a go last night. And I have to say, it came out really great! No boiling water first, no sautéing the onions or garlic; just throw it all into a pot, bring to a boil, and 9 minutes later, voila! I especially think this is a great summer dish because a) it’s quick, b) it doesn’t heat up the whole house, and c) you may have fresh basil and cherry tomatoes growing in your garden. What could be better?


Pre-cooking


You must try this! Pair with a glass of crisp sauvignon blanc and you’re good to go!


Martha Stewart’s One-Pan Pasta


Serves 4


Ingredients:


12 oz linguine

12 oz cherry or grape tomatoes, halved or quartered if large

1 onion, thinly sliced (about 2 cups)

4 cloves of garlic, thinly sliced

1/2 t red pepper flakes

2 sprigs basil, plus torn leaves for garnish

2 TB EVOO, plus more for serving

Coarse salt

4-1/2 C water

Freshly grated Parmesan cheese, for serving


Directions:

  1. Combine pasta, tomatoes, onion, garlic, red pepper flakes, basil, olive oil, 2 t salt, 1/4 t pepper, and water in a large straight-sided skillet (the linguine should lay flat).
  2. Bring to a boil over high heat. Boil mixture, stirring and turning pasta frequently with tongs or fork, until pasta is al dente and water has nearly evaporated, about 9 minutes.
  3. Season to taste with salt and pepper, divide among 4 bowls, and garnish with basil. Serve with drizzle of olive oil and Parmesan.
I call this "Still Life with Pasta." :-) 


Saturday, June 20, 2020

Mango-Coconut-Banana Bread


What’s that saying, “when life gives you lemons, make lemonade?” Well, how about when life gives you mangoes? Lots and lots of mangoes. 

We are lucky to live in an area with plentiful mango trees (in addition to passionfruit, guava, beach grapes, and other assorted fruits), and they have literally been falling out of the trees. Every morning when I walk with friends, we return home with armfuls of ripe, beautiful mangoes. Then I have to figure out what to do with our haul. Of course you can just eat the mangoes out-of-hand, but I generally like to add them to yogurt or a smoothie, or a baked good, which is what I have done today.

From the folks over at food52.com, I found this gem. It sounded great as is, but since I’m living in the tropics I decided to add some flaked coconut, and I’m glad I did. It gives the bread a terrific texture, which it otherwise would not have had. If you’re coconut-adverse, just omit it. This bread is moist and flavorful, although I think next time I will up the mango ante to a whole mango instead of half, as it could have used a bit more mango flavor. I mean, it’s not like I didn’t have enough mangoes!

In addition, I tried a trick I’d read about awhile ago, where you sprinkle sugar over the greased pan instead of flouring it. It gives the bread just a hint more sweetness and a little bit of crunch.

Let me know if you make this recipe and what you thought! Have a great day!


Mango-Coconut-Banana Bread (adapted from food52.com)

Makes 1 loaf

Ingredients:

1 C sugar (plus a teaspoon for the pan)
1/2 C unsalted butter, room temp
2 large eggs
2 ripe bananas
1/2 ripe mango, cubed
1 TB milk
1 t ground cinnamon
2 C flour
1 t baking powder
1 t baking soda
1 t salt
3/4 t vanilla
1/2 C flaked sweetened coconut

Directions:
  1. Preheat oven to 325 degrees. Grease or line a 9x5" loaf pan, then sprinkle 1 teaspoon sugar over the bottom and sides of pan.
  2. Cream the sugar and butter in large mixing bowl until light and fluffy.
  3. Add the eggs one at a time, beating well after each addition.
  4. In a small bowl, mash bananas with fork.
  5. Mix in the milk, cinnamon, and vanilla until combined.
  6. Then gently mix in the mango, set aside.
  7. In another bowl, mix together flour, baking powder, baking soda, and salt.
  8. Add banana mixture to creamed mixture and stir until combined.
  9. Finally, add in the dry ingredients and the coconut.
  10. Pour batter into loaf pan and smooth the top. Bake approximately 65-75 minutes, or until a toothpick inserted into center comes out clean.
  11. Let cool on rack before removing from baking dish.

Tuesday, October 3, 2017

Sicilian Pistachio Cookies (gluten-free)

Greetings, Dear Readers.

I feel a bit out of sorts posting a simple cookie article after yesterday's horrible event in Las Vegas (I wrote it last week). Even though I feel depressed and at a loss to come to terms with the senseless violence, and our government's inability to take serious action about realistic gun control, sometimes it does help to cook or bake to relieve some of the stress and anxiety (I know it helps me). Even better would be to invite friends and/or neighbors for a meal, or "coffee and..." to talk peacefully and calmly, or simply to just be together. I hope you and your loved ones are safe.
--------------------
While summer is my fave season, I do love the Fall - the warm days/chilly nights, country drives, throwing on a cute little jacket, and the luscious flavors of Fall - plums, pumpkins, pistachios, cinnamon, cardamom. 

Last year at this time I was in Sicily (read about my trip here and here). Ahhhhhh. Beautiful, mysterious, complicated, delicious Sicily. How I loved that trip! Feeling a bit “homesick” for my ancestral homeland, I needed to make something to help me get back there virtually. 

Mt Etna's volcanic landscape
The adorable donkeys of Etna Donkey Trekking
That’s when I came across this recipe on Food52 for Sicilian Pistachio Cookies. Pistachios are a huge part of Sicily’s agriculture, especially near Mt Etna, which we visited. We were taken in by the otherworldly volcanic landscape of Etna. The mountain had just erupted a couple of months before we were there and black lava was everywhere.  The trusty, adorable donkeys of Etna Donkey Trekking carried us over craters, through ancient forests, and afforded us panoramic views otherwise impossible. I highly recommend this excursion if you visit the Catania area.

Back to the cookies! These little gems are SO easy to make, and as a bonus to people who need to watch their gluten intake - they are GF! The cookies have it all: crunch, spice, citrus - a trifecta of deliciousness! 
crunch, citrus, spice pre-rolling

What are your favorite Fall recipes? Do they bring back memories of a favorite trip? Leave a note below. And let me know if you bake these cookies!

Enjoy!


Full recipe here!

Tuesday, August 1, 2017

Soft Shell Crabs with Orzo Summer Salad


One of our favorite summer meals is soft shell crabs. Last week, we were able to buy “whales” at Gus and Company Fish Market in Montclair (whales are the largest size of soft shells). They weren’t cheap but they were incredibly meaty and brimming with freshness.

After a light dusting of seasoned flour, the crabs are sautéed in a delicate mix of just butter, olive oil, and cream sherry. They come up golden brown, crisp, and delectable. I can’t provide a formal recipe for you because it was a “verbal” recital from a friend’s long ago stint at a New Jersey seaside restaurant. These are the best soft shells we've ever had. Here’s the gist:

Mix some all-purpose flour with salt, freshly ground pepper, and a bit of paprika in a bowl. Transfer seasoned flour to a plate or container big enough to use for dredging. 

Dry the crabs with a paper towel. Dredge crabs in seasoned flour and set aside.

Melt 1-2 TB of butter and 1-2 TB olive oil (it should be a 50/50 proportion) in a heavy duty pan (we use cast iron). When the pan is hot, add the crabs, shell side down and cook until golden. Flip and cook about 3-5 minutes, depending on size of crabs. Remove crabs from the pan, add about 1/4 cup of cream sherry and cook until alcohol evaporates and approximately 2 TB of sauce remains. Pour pan sauce over crabs and serve.
We made a delightful orzo salad to accompany the crabs. From the good cooks over at Food52, this salad is the perfect summer side, packed with sweet cherry tomatoes, scallions, fresh spinach, and salty feta. It’s colorful and delicious, and as a bonus, you can make it ahead of time. If you like, a bright Sauvignon Blanc is very nice with this meal.


Happy Summer Eating!

Tuesday, May 9, 2017

Lessons from "Baking Fails"

A few weeks ago, I came upon a recipe for a cookie that caught my eye. It’s called “torcetti,” a type of old-school Italian sugar cookie. It’s a bit unusual as it is made with yeast, which most cookies do not have. Besides yeast, the recipe called for European-style butter which I had never used so this intrigued me. I gathered up the ingredients and went to work.

But first a little history. According to the website, Turin Epicurian Capital, these cookies date back to around 1700. An article supposes that during around that time, while waiting for bread to bake in community ovens, some of the bakers took leftover dough, shaped it into a type of breadstick, coated them with sugar or honey, formed them into little “twists,” and baked them. Voila - torcetti! 

There are a zillion recipes for torcetti out there. I used one from Food52, one of my trusted sites, and I liked the fact that it recommended an overnight rise.
Torcetti from Food52

Off I went to work! Followed the recipe to the letter - used a thermometer to test the water temperature to dissolve the yeast; placed the dough in the oven for the first rise; creamed the softened butter and added it to the dough. You get the idea…

My first pangs of fear that this was turning into a “baking fail,” was trying to incorporate the butter into the dough. It took forever and a lot more flour than called for to get a non-sticky, manageable dough. Finally, it came together! Since I was utilizing the overnight rise, I covered the dough with plastic wrap and placed the bowl in the fridge.  

The next morning, giddy with anticipation, I pulled the dough from its’ chilly slumber, and stared at the bowl in disbelief. It had not risen at all. At all. My first thought was, “well, that was a big waste of expensive European butter, four cups of flour, wah, wah, wah.” 

But I really didn’t want to toss the whole thing out, so I preheated the oven to 250 degrees, turned it off, shoved the covered bowl in, and waited. I figured I had nothing to lose at this point. In about an hour, the dough had magically doubled in size. I was thrilled! Maybe this wasn’t going to be a wasted effort after all. 

after the oven-rise
Again, I went back to the directions: rolled out the dough to the stated dimensions, cut the strips, rolled in sugar, and baked them. 
ready for the oven
Twelve minutes later, I had the saddest looking cookies on my baking trays. But, I thought, even if they don’t look great, if they taste good, I’ll be happy. Let me cut right to the chase here and not keep you in suspense (although I'm sure you've guessed the outcome): they were terrible! Heavy, dense, tasteless. I was so disappointed!I threw them all out.
finished cookies

So what did I learn from this? I rediscovered how much I LOVE working with yeast dough! The last yeasty-type recipe I made (a few years ago) was the fabulous brioche from Joanne Chang of Flour Bakery in Boston. The smell as I worked the dough was intoxicating. And kneading it put me in an almost zen-like state. There is  definitely something to be said for how baking can be relaxing and reduce stress

I’m not sure why my torcetti did not come out as they should (I don't think it was the recipe); perhaps the yeast was old (even though the expiration date was months away), maybe I overworked the dough? Who knows? Will I attempt them again? Definitely. 
sad cookies

I know a lot of people may not feel that baking is relaxing, but if you focus on the physical activity of rolling or kneading the dough, enjoy the smell of the yeast or the spices in your recipe, you’ll most likely forget about what else is going on in other parts of your life - the daily stresses - at least for awhile. Making these torcetti reminded me of the pleasures of baking. 


Have you had a baking fail that you’ve learned from? Leave a comment below.

Monday, March 20, 2017

Baked Quinoa with Roasted Butternut Squash and Gruyere


Happy Spring! It’s here at last and I, for one, am thrilled! Even though the winter here in NJ wasn’t as bad as it could have been, I absolutely detest the cold, gray days. So I say, onto brighter, warmer, sunnier days!

And now that we've rounded the bend from winter, you may want to start thinking about options for the upcoming Easter holiday, or Spring dinner parties, and I've got a great suggestion for you. The recipe, as it stands, doesn’t work for Passover due to the breadcrumbs, but you could substitute matzoh meal and it would probably succeed nicely.

We eat a lot of quinoa in my home, and although we usually jazz it up by making it with chicken stock (rather than water) and adding in diced veggies and fragrant herbs, it’s still not all that exciting. But last week I found a recipe on food52 that piqued my interest: Baked Quinoa with Roasted Butternut Squash and Gruyere. Sounds good, no? Indeed!

The recipe calls for fresh breadcrumbs and I urge you to follow the recipe rather than using store bought crumbs. It really does make a difference and it’s so easy to make your own. You can either use a leftover baguette, or buy a couple of rolls. Simply pulse the bread (torn into pieces) in the food processor, and voila, fresh breadcrumbs! Any crumbs you may have left over can be frozen for a future use. It really couldn’t be easier and the result is worth it. 

Besides being delicious, this bake with a golden crunchy topping is versatile. It can stand alone as a hearty non-meat main course, or it can shine as a lovely side dish to say, a crisp roast chicken or oven-baked pork chops. It’s good for a crowd - it bakes in a large 9x13 baking dish - but it also keeps well several days in the refrigerator. 

Here’s wishing you a lovely Spring! 


Sunday, July 31, 2016

Al Fresco Dining

Last weekend I ramped up the outdoor cooking and dining. Since we were in Alaska the early part of the summer, we got a late start enjoying the backyard to its fullest.

On Saturday morning, after coffee and the paper (outside, of course) we were off to the Paterson Farmer’s Market. It’s the first time we’d been there this season (and it’s the end of July already!). The market was bursting at the seams with gorgeous produce and flowers. We immediately headed to our favorite farmer to see if she had any zucchini flowers (even though it was mid-morning and they are usually first to go). Success! They had beautiful blossoms, albeit small, but nice. We also picked up a basket of regular zucchini and some ripe tomatoes. Here in the Garden State we're all about #jerseyfresh!

On the way home, I fired off a note to my friend over at OlderFatterHappier.com for her zucchini flower recipe, remembering how good they looked on her site a few weeks ago. By the time we got home, the recipe was in my inbox. However, after washing and inspecting the little flowers, we felt they were a tad too small to stuff so I moved on to Plan B (finding a suitable substitute recipe!). 
Food52 did not let me down. They supplied a fabulous recipe for a zucchini flower frittata, and since one of my most favorite things is breakfast al fresco, we decided to hold the flowers for Sunday brunch. The frittata was absolutely delicious! After a quick sauté of a few chopped blossoms and onions, you pour the egg mixture into an oven-proof pan, place the remaining whole blossoms on top, and into the oven it goes for a short bake. 


Later in the day, I threw together a wonderful tomato/nectarine/basil/ricotta salad. Just mix quartered tomatoes and nectarines in a bowl, add some chopped basil, and crumbled ricotta salata (you could also use torn bufalo mozzarella or crumbled feta), extra virgin olive oil, salt, ground black pepper and let the flavors marinate for a few minutes while you grill. Served alongside fabulous “lacquered” chicken thighs, it was a fabulous day of outdoor dining. There is really no recipe for these wonderful chicken thighs. We merely marinate boneless chicken thighs with Mama Sita’s marinade for a few hours in the fridge, then grill. The result: crispy, delicious, and moist chicken! 

But wait! There’s more! Remember those zucchini I bought at the Farmer’s Market? Well, in addition to grilling a few for dinner, I decided to use the rest for an incredible Double Chocolate Zucchini Bread (from the King Arthur Flour site). Of course, I’ve made zucchini breads before (hasn’t everybody at about this time of the summer?), but this one (IMHO) should definitely be at the top of the list. Brimming with shredded zucchini, honey, cocoa, espresso powder, and chocolate chips, it was fantastic! I strongly encourage you to try this recipe!

Now, of course, any al fresco day at our house wouldn’t be complete without our favorite summer drink: mojitos! This drink personifies summer for me, and I’ve been using this same recipe (see below) for the past couple of years. Try it, see if you don't agree that it is a winner. If you have a mojito recipe you’re partial to, please share!

Happy Summer!
Perfect Mojito recipe

Introduction 
This is a very simple and delicious drink to make, but unfortunately it gets muddled up (literally) too often. There are two important keys that will guarantee a perfect Mojito every time. First, you must use fresh-squeezed lime juice. No premixes or bottle lime juice here — they just won’t cut it. Second, the lime juice to simple syrup ratio must be 1:1. Do not take liberties. Use a jigger for accuracy. If you get these two things right, you’ll be making perfect Mojitos at every party! 
Ingredients 

10-15 mint leaves, plus sprig for garnish 

1 oz. fresh lime juice 

1 oz. simple syrup (see Note) 

2 oz. premium rum (such as 10 Cane, Bacardi Superior, Cruzan, etc.) 

Splash of soda water 

Steps 
In the bottom of a rocks glass, muddle the mint leaves with the lime juice and simple syrup. (Muddle lightly to just release the oils in the mint, do not pulverize the leaves.) Add the rum. Top with crushed ice and the soda water. Stir well from the bottom up. Garnish with the mint sprig and serve.
Notes 
To make simple syrup: Combine 2 cups sugar and 2 cups water in a medium saucepan. Over medium heat, stir until sugar is completely dissolved. Let cool completely, then bottle and keep refrigerated until ready to use. This makes enough for 10 Mojitos.