Friday, July 23, 2021

Recipe-in-a-Flash: Watermelon, Feta, Black Olive Salad


A delish, quickie from Nigella Lawson. You can put this refreshing little salad together in about 5 minutes. It makes a perfect light lunch, or a terrific first dinner course on a balmy summer night. The combination of juicy watermelon, salty feta, briny black olives, fresh mint, and parsley is a winner. Plus, it is a gorgeous presentation.


Watermelon, Feta, Black Olive Salad (Nigella Lawson)

Serves 8*


Ingredients:


1 small red onion

4 limes

3-1/4 pounds watermelon (sweet and ripe)

8 oz feta cheese

1 bunch fresh Italian parsley

1 bunch fresh mint (chopped)

1/4 C extra virgin olive oil

2/3 C pitted black olives (I used Kalamata)

Black pepper


Directions:

  1. Peel and halve the red onion and cut into very fine half-moons and put in a small bowl to steep with the lime juice, to bring out the transparent pinkness in the onions and diminish their rasp. Two limes’ worth should do it, but you can find the fruits disappointingly dried up and barren when you cut them in half, in which case add more.
  2. Remove the rind and pits from the watermelon, and cut into approximately 1-1/2” triangular chunks (Nigella says math is not her strong suit so she hopes this makes sense). Cut the feta into similar sized pieces and put them both into a large, wide shallow bowl. Tear off sprigs of parsley so that it is used like a salad leaf, rather than a garnish, and add to the bowl along with the chopped mint.
  3. Tip the now glowingly puce onions, along with their pink juices over the salad in the bowl, add the oil and olives, then using your hands, toss the salad very gently so that the feta and melon don’t lose their shape. Add a good grinding of black pepper and taste to see whether the dressing needs more lime.

*Note: Nigella’s recipe is written for 8 servings. I very easily adapted it downward, but used her original measurements in this printing.

Wednesday, July 14, 2021

Peach Pound Cake


My annual order of gorgeous Georgia peaches from The Peach Truck arrived a couple of weeks ago. They were in peak, picture-perfect condition so I could start enjoying them immediately. Besides eating them out-of-hand (over the sink!), and using them in a lovely peach-tomato salad, of course I wanted to make a dessert and this recipe from the NY Times cooking site sounded terrific. Not only does it have peaches within the cake, it also has peaches in the glaze! This cake is so moist, and bursting with buttery-juicy-peachy flavor. My pictures do not do justice to this wonderful cake. I took a photo of the cake from the side so you can see the height you get with this cake.


Peach purée


Pre-glaze

Post-glaze


When looking at the recipe, it seems like there are quite a few steps, but it’s a really easy cake to put together. It keeps well-wrapped on the counter for 3 days, or a bit longer in the fridge (let it come to room temp before serving). You could serve it with fresh whipped cream, but it really doesn’t need anything else. If you have ripe peaches on your counter, make this cake!


Look at those big peach chunks!


Peach Pound Cake (NY Times)


Ingredients:


1 C unsalted butter (2 sticks), melted and cooled to room temp, plus more for greasing the pan


2-1/2 C AP flour, plus more for dusting the pan


3 medium, RIPE, red-hued peaches (about 1 pound), pitted (see note)


1 TB fresh lemon juice


3 large eggs, plus 1 large egg yolk, beaten


1-1/2 t vanilla extract


1 C unsifted confectioners’ sugar, plus more as needed


1-1/2 C granulated sugar


2-1/2 t baking powder


3/4 t kosher salt


Directions:


Step 1: heat oven to 325°F. Lightly butter and flour a 9”x5” loaf pan and set aside.


Step 2: dice 1 peach into 1/3” pieces. Pat the pieces dry with a paper towel and set aside.


Step 3: add the remaining 2 peaches and the lemon juice to a food processor or blender, and blend on high until completely puréed. Measure out 1 leveled cup of the purée and transfer it to a mixing bowl along with the melted butter, eggs, egg yolk, and vanilla. Whisk to combine and set aside.


Step 4: completely scrape down the sides of the food processor, and make the icing using the small amount of puréed peaches still remaining. Add 1 cup of the confectioners’ sugar to the remaining peach purée in the food processor and blend on high until combined. The icing should be thick but thin enough to drizzle. Add more confectioners’ sugar to thicken or a splash of water to thin, as needed. Cover and set aside until it’s time to ice the cake.


Step 5: in a large mixing bowl, add the flour, granulated sugar, baking powder, and salt, and whisk to combine. Pour the peach mixture into the flour mixture, and whisk well until the batter is thoroughly combined, then fold in the diced peaches. Transfer the batter to the loaf pan, spread evenly to the edges, and bake until crusty and golden brown on the top and a toothpick inserted in the center comes out clean, about 75-80 minutes. Remove from the oven and allow to cool for 10 minutes before transferring to a wire rack.


Step 6: stir the icing a final time and spread it on top of the warm cake, allowing the extra icing to drip down the sides. Cool the cake to room temp. Slice and serve, or wrap tightly with plastic wrap and store on the counter for up to 3 days.


Note: use the boldest-colored peaches you can find, as their skins will lend blush to the glaze. However, you can also peel the peaches, if you mind the specs of skin.


Tuesday, June 29, 2021

Chocolate Chip Cookies


You may or may not know this about me, but I am not a raging chocoholic (shocker, I know!). My tastes run more to oatmeal raisin, anything cinnamon-y, a good old-fashioned coffee cake - you get the gist.


But last week, for some really strange reason, I had a desire for chocolate chip cookies. I had recently run across a recipe from Nigella Lawson that looked terrific. As I do, she likes chocolate chip cookies that are neither too thin/crispy, nor too fat/doughy. She claimed to have perfected the ultimate cookie. And since I was having this totally out of the ordinary (for me) craving, I thought this would be THE recipe to try. 


Her recipe calls for milk chocolate morsels, but when I saw espresso chips in the store, I had to have them. I’m glad I made the swap. The espresso chips give the cookies a much deeper, richer flavor (highly recommend!).


This recipe makes 14 large cookies. Another cookie pet peeve of mine is the  trend toward BIG cookies - I just don’t get it. I made them according to the directions, but I think next time (yes, these were so good there will be a next time), I will make them a tad smaller.


Besides the chips, the only other change I made was to add a 1/2 teaspoon of salt, which I think is essential. 


The cookies have the perfect texture and flavor that I want in a chocolate chip cookie. Whip up a batch and let me know if you agree! All chocolate chip cookie opinions are welcome here.


Chocolate Chip Cookies (adapted from Nigella Lawson)


Ingredients:


1-1/4 sticks soft, unsalted butter

2/3 C soft light brown sugar

1/2 C superfine sugar (I used regular granulated sugar)

2 t pure vanilla extract

1 egg (fridge-cold)

1 egg yolk (fridge-cold)

2 C all-purpose flour

1/2 t baking soda

1/2 t salt

1 9 oz bag espresso morsels


Directions:

  1. Preheat oven to 325°F
  2. Line a baking sheet with baking parchment.
  3. Melt butter and let it cool a bit. Put the brown and white sugars into a  mixer bowl, pour the slightly cooled, melted butter over them and beat together.
  4. Beat in the vanilla, the cold egg, and cold egg yolk until your mixture is light and creamy.
  5. Slowly mix in the flour, baking soda, and salt until just blended, then fold in the chips.
  6. Scoop the cookie dough into a 1/4 C measure or a quarter-cup round ice cream scoop, and drop onto the prepared baking sheet, plopping the cookies down about 3” apart. You will need to make these in two batches, keeping the bowl of cookie dough in the fridge between batches.
  7. Bake for 15-17 minutes in the pre-heated oven, or until the edges are lightly toasted. Cool on the baking sheet for 5 minutes before transferring to wire racks.


Make ahead: the cookies can be made up to 3 days ahead and stored in an airtight container. Will keep for a total of 5 days.


Freeze: the baked cookies can be frozen in an airtight container or resealable bag for up to 3 months. Defrost for 2-3 hours at room temp. Unbaked cookie dough can be scooped onto parchment-lined baking sheets and frozen until solid. Transfer frozen dough to resealable bags and freeze up to 3 months. Bake direct from frozen, as directed in the recipe, but adding an extra 2-3 minutes to the baking time. And you could always freeze the spare egg white (bag it, label it, freeze for up to 3 months) for meringues at a later date. Use within 24 hours of defrosting.

Tuesday, June 22, 2021

Martha Stewart's One-Pan Pasta


Greetings, dear readers!


I hope things are well with you in your part of the world.


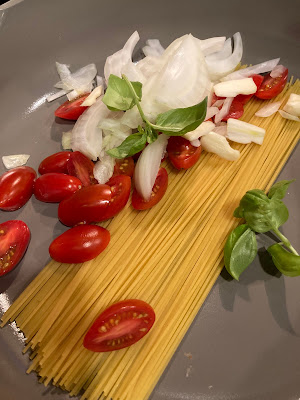
So, I’ve had this recipe from Martha Stewart for awhile now (clipped from food52.com). The one-pan thing intrigued me — throw everything into a pan, including the uncooked pasta, and cook. Couldn’t be easier, right? I decided to give it a go last night. And I have to say, it came out really great! No boiling water first, no sautéing the onions or garlic; just throw it all into a pot, bring to a boil, and 9 minutes later, voila! I especially think this is a great summer dish because a) it’s quick, b) it doesn’t heat up the whole house, and c) you may have fresh basil and cherry tomatoes growing in your garden. What could be better?


Pre-cooking


You must try this! Pair with a glass of crisp sauvignon blanc and you’re good to go!


Martha Stewart’s One-Pan Pasta


Serves 4


Ingredients:


12 oz linguine

12 oz cherry or grape tomatoes, halved or quartered if large

1 onion, thinly sliced (about 2 cups)

4 cloves of garlic, thinly sliced

1/2 t red pepper flakes

2 sprigs basil, plus torn leaves for garnish

2 TB EVOO, plus more for serving

Coarse salt

4-1/2 C water

Freshly grated Parmesan cheese, for serving


Directions:

  1. Combine pasta, tomatoes, onion, garlic, red pepper flakes, basil, olive oil, 2 t salt, 1/4 t pepper, and water in a large straight-sided skillet (the linguine should lay flat).
  2. Bring to a boil over high heat. Boil mixture, stirring and turning pasta frequently with tongs or fork, until pasta is al dente and water has nearly evaporated, about 9 minutes.
  3. Season to taste with salt and pepper, divide among 4 bowls, and garnish with basil. Serve with drizzle of olive oil and Parmesan.
I call this "Still Life with Pasta." :-) 


Saturday, June 5, 2021

Blueberry Buckle!


It’s June and you know what that means (cue the song “June is Busting Out All Over!” - Google it)? Blueberries! Of course, you can get blueberries anywhere and almost anytime of year nowadays, but for big, fat, juicy, super-fresh, farmer’s market blueberries, you’ve got to wait for June. And to celebrate official blueberry season, I made this gorgeous Blueberry Buckle


Originally, this recipe from the ever-reliable folks at King Arthur Flour, was gluten-free (made with Measure-for-Measure gluten-free flour), but my version was made with regular AP flour. Other than that, and the addition of a bit of nutmeg, the recipe remains the same. Adding some chopped pecans to the streusel wouldn’t hurt…


The cake bakes up so light and fluffy, with a fabulous streusel topping. I added a light dusting of confectioners’ sugar right before serving, because why not? It freezes very well, too, so if you’ve got the time (and the berries), make it now, cut into squares, wrap it well, and freeze. Then when a friend drops by for coffee, you can pull out a few squares and be ready in no time.


Happy Fresh Berry Season!


Blueberry Buckle (adapted from King Arthur Flour)


Ingredients:


Streusel:

1/3 C sugar

1/2 C AP flour

1 t cinnamon

1/2 t nutmeg

1/8 t salt

4 TB butter, at room temperature, at least 65°F


Cake

2 C AP flour

2 t baking powder

1/2 t salt

3/4 C sugar

4 TB butter, softened

1 large egg, room temperature

1 t vanilla extract

1/2 C milk, room temperature

2 C fresh (or frozen) blueberries


Directions:


  1. Preheat oven to 375°F. Lightly grease an 8” square, 9” square, or 9” round pan; make sure your pan of choice is at least 2” deep.
  2. To make the streusel topping: mix the sugar, flour, cinnamon, nutmeg, and salt in small bowl. Work in the butter until the mixture becomes evenly crumbly. Set aside.
  3. To make the cake: in a medium-sized mixing bowl, whisk together the flour, baking powder, and salt.
  4. In a separate bowl, beat together the sugar, butter, egg, and vanilla.
  5. Add the flour mixture and the milk alternately to the sugar/butter mixture, beginning and ending with flour. Gently stir in the berries.
  6. Pour the batter into the prepared pan. Sprinkle the streusel on top.
  7. Bake the cake for 45-50 minutes, or until a toothpick or knife inserted into the center comes out clean.
  8. Remove the cake from the oven, and set it on a rack to cool for 10 minutes. Serve right from the pan. Or to transfer to a serving plate, loosen the sides with a knife or spatula. Holding the pan in one hand, gently tip the cake out onto your other hand, remove the pan, and turn the cake topping-side up onto a serving dish. 
  9. Store cake, covered, for a couple of days at room temperature; wrap securely and freeze for longer storage.


Wednesday, May 5, 2021

Greek Easter Cookies (Koulourakia)


Do you ever want “just” a simple, but delicious, cookie? One that’s easy to make, doesn’t have a zillion ingredients, keeps well, and is perfect for enjoying as a light breakfast, or as an after dinner treat? Well, look no further.


In doing research to bring a traditional dessert to a friend’s home for Greek Easter dinner, I happened upon Koulourakia, a crispy, yet buttery-soft, citrus-scented cookie. At first taste, right after the first tray emerged from the oven, I was not overly impressed. They were nice enough, but not anything special. But after my second tasting (quality control!), they started to grow on me. I loved their adorable little braided shape and the lightness of the dough. My dinner companions loved them (and the highest complement of all, telling me they reminded our hostess of her Greek mother’s version!); and as I continued to enjoy one (or two) after dinner last night, dunking them into my coffee, I proclaimed them a winner! 


I think next time (because there WILL be a next time), I might add a bit more orange flavor, and maybe instead of sesame seeds as a topping, I might opt for some crystallized sugar for a touch more sweetness. Of course, I know this totally changes the original nature of this cookie, but no harm in experimenting, right?


Happy Spring!

Photo courtesy of Pexels.com 


Koulourakia (Greek Easter Cookies) 

Adapted from curiouscuisiniere.com 


Ingredients:


1/2 C unsalted butter, softened

3/4 C sugar

2 eggs

1/4 C milk, warmed to 80°F

1 t pure vanilla extract

1 orange, zested

2 t baking powder

2-1/2 C unbleached all-purpose flour

1 egg beaten with 1 TB of water (for the egg wash)

Sesame seeds (for topping)


Directions:

  1. In large bowl, cream the butter and sugar until light and fluffy. Add the eggs, and beat until lightly colored. Add the milk, vanilla, orange zest, and baking powder (mixing as you add).
  2. Add the flour, a little at a time, while mixing, until you have a soft but not sticky dough.
  3. Cover the dough with plastic wrap and chill 30 minutes.
  4. While the dough is resting, preheat oven to 350°F.
  5. Once the dough has rested, dip your fingers in a little flour and pinch off a 1” ball of dough. Roll the ball into a 6” rope on a lightly floured surface. Fold the rope in half and twist the two strands together to form the cookie. Continue with the remaining dough (see note at bottom of recipe).
  6. Place the shaped cookies on a parchment-lined baking sheet, 1” apart.
  7. Brush each cookie with the egg wash. Sprinkle with sesame seeds.
  8. Bake for 15-20 minutes (mine took exactly 15 minutes, so watch carefully), rotating the baking sheets halfway through baking for more even cooking. Cookies are done when lightly golden.
  9. Let cool on the baking sheet on a rack for 5 minutes before transferring to a rack to cool completely.
  10. Store cooled cookies in airtight container for up to 3 weeks.

Note: this recipe makes alot of cookies (approximately 50-60) so cover remaining dough with plastic wrap while first batch bakes to prevent dryness.

Friday, April 16, 2021

Farmhouse Buttermilk Cake with Pecan Streusel Topping


Leftover buttermilk is a predicament I think most bakers find themselves in from time to time. It’s usually sold in quart containers, and typically, you only need a cup or less for a recipe. So what to do with the remainder? This is where I found myself earlier this week, after having realized I had an open bottle of buttermilk in the fridge with an approaching expiration date and no immediate plans to use it (see tip at end about freezing buttermilk).


After much Googling, I found this recipe that sounded terrific. Of course, it helped that I had all the ingredients in the house. This cake from The Cafe Sucre Farine web site was adapted from a King Arthur recipe, and it is a hit! It reminded me of the luscious, addictive pralines I enjoyed on my first trip to New Orleans, only in cake form. It’s got everything (IMHO) a cake should be: moist (because buttermilk), flavorful (of course!), a little bit crunchy (thanks to the pecan streusel), and easy! It’s a one-bowl wonder (well, two, if you count the streusel mixture) and no mixer required (although I do think the initial mixing of the butter and brown sugar would be easier with a hand or stand mixer). For the streusel, I used the incredible pecans from The Peach Truck - what a revelation really fresh pecans are. Raw and natural, these pecans are everything you imagine a Georgia pecan to be.


This cake is the perfect after-dinner accompaniment to a pot of coffee. A bit too sweet, I think, for a breakfast treat, but you may feel differently.  I thoroughly enjoyed a piece last night and it took all my restraint not to go back for another slice. Now my only problem is, what do I do with the rest of it? I hope it freezes well!


Farmhouse Buttermilk Cake with Pecan Streusel Topping


Ingredients:


Cake:


1/4 C butter, very soft

1 C light brown sugar

1 large egg

1 C buttermilk

1 t vanilla extract

1 t baking soda

1/2 t salt

1-1/2 C all-purpose flour


Streusel:


3 TB melted butter

1/2 C light brown sugar, packed

2 TB half & half

1/8 t salt

3/4 C diced pecans


Directions:

  1. Preheat oven to 350°. Spray a 9” round cake pan (with at least 2” tall sides) with baking spray and line with parchment paper. Set aside.
  2. Combine the butter and brown sugar and stir until smooth.
  3. Add the egg, beating again until smooth.
  4. Stir in the buttermilk and vanilla extract.
  5. Sprinkle the flour, baking soda, and salt evenly over the top and stir until well combined.
  6. Pour the batter into the prepared pan.
  7. Bake the cake for 30 minutes or until a toothpick inserted in the center comes out clean and/or the cake springs back when lightly touched in the center.
  8. During the last 10 minutes of baking time, prepare the topping. Stir the butter and the sugar together. Add the milk, pecans, and salt. The glaze will be thick, but pourable (don’t let this sit too long, or it will become too thick to pour).
  9. After the cake has baked for 30 minutes, pour the topping over the cake and return it to the oven for another 10 minutes (for a total baking time of 40 minutes). Remove the cake from the oven and allow to cool for 20 minutes in the pan. Sprinkle lightly with flaky sea salt, if desired, and serve warm or at room temp. Topping will firm up as the cake cools.
  10. Cake can be served in the pan or on a serving platter/cake stand. To serve on a platter, invert cake onto a dinner plate, then invert again so the topping is right-side up. 
PS: I found a great way to freeze leftover buttermilk here!. I’ve got an ice cube tray cooling in my freezer right now.